Create a new file. Setting as picture below:


Select The Gradient Tool and click on gradient box.


First make a new layer, then Get the elliptical marquee tool out and draw a eclipse from top left to bottom right.Fill it with white.Set Transparency to 36% in Blending Options dialog box.


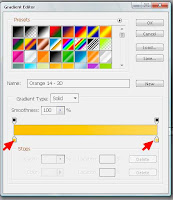
Select The Gradient Tool and click on gradient box.
New windows will pop up, Set it out a like I have done.

Now we need to create diagonal lines. Start by creating a 3 pixels by 3 pixels canvas, zoom in to 1600%, use pencil tool, choose black and draw a line diagonally across your canvas, like so,


Then in the menu go Edit > Define Pattern.Give it any name you want. Then go back to your userbar background layer, press Shift+Backspace.Choose custom pattern.(Opacity 22%)
Your userbar will become like this.

Take any picture for our userbar.It can be anything.Anime,games,software.Use your creativity.
I use Tenuktutorial.blogspot.com as subject.
Then for text, I use Segoe UI. But normally userbar use Visitor TT2 (BRK) font.
Now we add the some effects which gives it the 3D look.
First make a new layer, then Get the elliptical marquee tool out and draw a eclipse from top left to bottom right.Fill it with white.Set Transparency to 36% in Blending Options dialog box.
Done!!!Yeah!!


